Monday, December 5, 2011

Thinking of You - Challenge Card

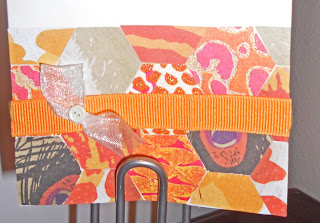
I am not sure about everyone else, but my weekend was quite full and I did not even get half of the needed things done (mostly because of my poor sick daughter, it is awful when they get a cold!).  So to accommodate my time restrictions and still play with all the fun card challenges, I combined two challenges into one card.  This requires a lot more thought and planning than one may think!  First off, I selected the colors to accommodate the The Play Date Cafe Challenge#109 using smoky purple, champagne, and blush colors.  Then I designed the card according to the Freshly Made Sketches challenge #13. All in all, I really loved the look that turned out on this card.

Supplies used:
Card stock paper (DCWV), patterned paper (DCWV), border and vine punch (Martha Stewart Crafts), hexagon punch (Creative Memories); adhesive gems (Recollections), stamp & ink (Studio G); 3D adhesive (pop dots); adhesive (Elmer's), ribbon (Offray).

Sunday, December 4, 2011

Thanks a Bunch - Challenge Card

So far I have never tried to make a card that fit more than one challenge, but this weekend due to the hectic schedule and just pure number of challenges I want to try, I combined two challenges into one card! One, Inkspirations #98, was a color challenge, where you had to use Saffron Yellow, Wasabi Green, Rose Red, and Whisper White as colors.  The second, Mojo Monday was to incorporate their sketch design in your card.  What do you think?


Supplies used:
Patterned papers & card stock (DCWV), adhesive (Elmer's), Glitter paper (DCWV), punches (Martha Stewart Crafts), ribbon (Offray), button (vintage), stamp & ink (Studio G).


Thursday, December 1, 2011

Christmas Card - Non Traditional Colors

Card Magazine's blog - CREATE: Blog was hosting a challenge this week that was to design a Christmas/Holiday card using non-traditional colors.  Inspired by the colors of one of my closest friends (and cousin!) Becky, I decided to give it a shot with Black and Pink (her faves) and Silver (one of my faves).


Here is my take on it.  The card itself was pretty easy to put together, it was just getting the papers to coordinate! Once I had that, it all just fell into place.  The funny thing?  The papers on this card are all scraps I had in my large scrap bin! I was just going through them and set aside ones that caught my eye.  I love using scraps like this, it is like finding a lost treasure!

Wednesday, November 30, 2011

Matching Card Set - Just Us Girls Challenge

My work is hosting a Holiday Party which is asking for raffle donations for our toy drive. I decided to make a card set to donate for the raffle, and about the same time I decided this, I also saw this fun challenge hosted by Just Us Girls, which wanted the card set to have matching packaging.  So, I thought I would give it a whirl! Here is my take, using green and orange colors as my baseline:

Here is a close up of the box that I made that goes with the card set (all the cards do fit inside, and yes, the box is made from paper as well!).  I opted not to put a name/tag on the box, as I was not sure where it would end up at the raffle, and this way it was still pretty generic.

Here is a sample of some of the cards in the set. The hard part was coming up with different designs (and they were all different!) with the same type of papers.  I found the key was embellishments and different layouts. These are among my favorite of the ten I designed:


What do you think?  If you are interested in knowing any of the supplies I used, just ask!  There were too many to identify!

Tuesday, November 29, 2011

Woodland Creatures Card - Wee Memories Challenge 76


One of the fun blogs I follow (Wee Memories) was hosting a challenge (#76) to make a card using woodland creatures. There were many of cute cards already designed for inspiration (go check it out!) and so I thought I would give it a shot.  I made this one right before Thanksgiving, and for some reason it just fits!


Supplies used:
Kraft (Recollections); Patterned paper (Recollections - Any Occasion stack); Lace (scrap); Teal and brown card stock (Recollections); Punches (Marvy Uchida); Squirrel chipboard (DCWV); Stamps & ink (Studio G); Adhesive gems (Recollections); Adhesive (Elmer's).

And in the spirit of woodland creatures, here is a card I made for my Mom's birthday using a skunk because one of her favorite characters is Pepe le Peu. I used the same chipboard from the DCWV collection at the time, and used red one of her favorite colors.  Thought I would share it along with this one. What do you think?

Tuesday, November 22, 2011

Red, White, & Green Tag - Just Us Girls Challenge #111

One of the fun challenges I participated in this week was the Just Us Girls challenge - challenging a red, white, and green themed project.  Here is my take (and yes I was listening to Christmas music while making it!)


I made these two tags, they are slightly different but the same concept, with lots of layers, which must be my theme!  Over the white base, I layered red strips of paper that were border punched with designs, with a middle layer of velum.  Then on the upper portion I fixed punched leaves on the left side with three tiny gems for a makeshift "holly" look. Then I added a sentiment and ribbon to the punched portion on top.  Which one do you like?


Supplies used:
Red  card stock (Recollections); Green card stock (Recollections); Border punches (Martha Stewart Crafts & Recollections); Adhesive gems ( Recollections); Stamp & Ink (Studio G); Leaf punch (Martha Stewart Crafts); Ribbon (Offray); Adhesive (Elmer's).


Monday, November 21, 2011

the PDC # 108 - Challenge Card!

Fall is sure here in Oregon.  Last night between the wind and rain, many of the leaves were falling all over the roadway and in yards.  It was a little sad to me, as I love looking at the bright colors on the actual trees, when they fall off I know winter is getting closer!

Look at the fun tag I made for the Play Date Cafe challenge # 108!  The colors of this challenge bring the warm colors of fall that I love so much: copper, maroon, and turmeric.


Making this tag was pretty simple, it was getting the right color combination to match the challenge and make a balanced tag. The tag itself was not too hard, I used one of my punches to punch the kraft base, and another punch for the inner circle, and yet another punch to make the flowers.  All layering together for the right look.  What do you think?

Supplies used:
Kraft card stock (Recollections); Maroon decorative paper (DCWV), Glitter card stock (DCWV); Scallop circle punch & circle punch (Marvy Uchida); Daisy punch (Martha Stewart Crafts); Stamp & Ink (Studio G); Brads & eyelet (Making Memories); Brad/eyelet setter(Making Memories); Ribbon (vintage scrap); Adhesive (Elmer's).

Friday, November 18, 2011

Thank you very much card

Good morning!  Just sharing another card I crafted up.  When I saw the paper pack at the store, I had to have it.  I just loved the fun designs and wanted to see what I could make with it... The funny thing about this card is how layered it is with different papers, which the girls at work always love to point out how much I love to layer my clothes!


On this card I took two coordinating papers from the same paper pack and cut them down to size, adhering them to the card.  I then took brown card stock which I trimmed down with a fun border punch and layered it over the top.  I added some fun yellow ribbon, layering that over the top of the brown card stock, and lastly layered the tag stamped with a sentiment over the top of that. Whew!

What do you think?

Supplies used:
Patterned papers (Pressed Petals); Brown card stock (Recollections); Border punch (Martha Stewart Crafts); Yellow ribbon (Offray); Brown tag (K & Company); Ink & Stamp (Studio G); Adhesive (Elmer's)

Wednesday, November 9, 2011

Hello Darling Card

I made this bright card for my wonderful cousin as a surprise when she visits our house.  She is in our small dinky town a couple of days a week attending school at the college and we gave her a house key so she can have a place to land and of course come visit our dogs!  My daughter Lizzie loves to leave her pictures and candy and little surprises, so I thought I would join in as well with a nice card!


I love the stamp, but rarely have a chance to use it, and it went perfectly with the papers and color scheme, pink of course for her!

Supplies to make it:
Stamp & Ink (Studio G); Glitter Paper (DCWV); Patterned Paper (Recollections All Season); Kraft Cardstock (Recollections); Adhesive Gems (Recollections); Border Punch (Martha Stewart Crafts); Adhesive (Elmer's Non Wrinkle Glue).

Tuesday, November 8, 2011

PDC Challenge #106

Another challenge card for the Play Date Cafe - #106...  Except I made a tag instead.  The idea to this challenge was to incorporate gray, yellow, and pink.  What do you think?
On this tag I used a baking theme, and stamped the image on pink cardstock which I cut down and rounded the corners and punched a pretty border.  I layered this over yellow punched squares of different patterns and also gray textured cardstock for the base.  Lastly I embellished with some adhesive gems.  Simple, yet quite fun.

Supplies:
Corner punch (Making Memories); Border Punch (Martha Stewart Crafts); Stamps & Ink (Studio G); pink cardstock (Recollections); Yellow Papers (DCWV); Grey Cardstock (DCWV); Yellow Eyelet (Making Memories); Eyelet Punch/Setter (Making Memories); Yellow Ribbon (Offray); Adhesive Rhinestones (Recollections); Adhesive (Elmer's)


Wednesday, November 2, 2011

Handmade By - Buttons, Brads, & Bow

Recently I have started to branch out a little from my traditional card making, and started making gift tags. I incorporated some buttons, brads, and bows in order to submit to the Wee Memories Challenge.  Here is my attempt at one, and I swear the color looks much more vibrant in person!

For this one, I used a green card stock base that had tiny white polka dots on it. I then adhered patterned paper along the bottom, using a small strip of glitter card stock to frame the bottom.  After that, I stamped the sentiment and adhered to the card stock base, lastly embellishing with a ribbon bow and brad, and tiny brad buttons.  It is such a quaint little look.  What do you think?

Supplies:
Patterned cardstock (DCWV); Glitter card stock (Colorbok); Stamp & Ink (Studio G); Ribbon (Offray); Brads (Making Memories); Adhesive (Elmer's).

Monday, October 31, 2011

Halloween Shoes!

How fun are these?  So anyone who knows me well knows I adore shoes!  I have too many and especially love heels.  One day I was cursing the blogs and saw this wonderful how-to on how to make paper shoes, so of course I had to try!!


Now I like to make paper shoes just for fun.  These are sitting in my living room contributing to our Halloween decor!  I think I will tell anyone who will believe me they fell off the witch!

Supplies:
Black & Purple cardstock (Recollections); Grey cardstock (DCWV Old World Stack); Halloween ribbon (vintage); Halloween stickers (vintage); Border punch (Martha Stewart Crafts); Adhesive (Elmers).

Here is a look at my wall-hanging I made out of chipboard. It is not the typical Halloween decor, but I love it all the same.

Supplies:
Hexagon punch (Creative Memories); Circle Punch (Marvy Uchida); Square punch (Creative Memories); Corner rounder (Creative Memories); Stamps & ink (Studio G); Adhesive Gems (Recollections); Papers (DCWV); Halloween Ribbon (vintage).

Sunday, October 30, 2011

Play Date Challenge #105

Here is a tag I made for one of my challenges, what do you think?

First, I LOVE the color scheme of this challenge!  Blues and browns look so darling together.  This was a lot of fun to make too, punching the flowers and adding the cute little brads.  The flowers each were textured paper too, which make is quite fun! 

Supplies:  Kraft paper (Recollections); Corner looped punch (Martha Stewart Crafts); Brad Setter (Making Memories); brads (Making Memories); Stamp & Ink (Studio G); Flower punches (Martha Stewart Crafts); Textured brown paper (DCWV); Blue patterned paper (Creative Memories); Blue ribbon (Offray); Adhesive (Elmer's).

Friday, October 28, 2011

Fall is Here!

Fall always brings a sense of home to me. It is where I find more time to craft and enjoy the comforts of my home. I curl up with cider and spend hours designing away!

Here is my attempt at a fall card. One of the fun things about this card, is one of the colors does not seem like a fall color at all! The blue just gives it a little bit of pop!

Supplies used on this card:
Kraft (Recollections); Circle Punches (Creative Memories, Marvy Uchida); Papers (Pressed Petals, DCWV, Recollections, Creative Memories); Stamps & Ink (Studio G); Buttons (Vintage); Adhesives (Pop Dots, Elmer's; and Zots).

Thursday, October 27, 2011

Nutty for You!

I had made this lovely card for a challenge, and I absolutely adore the squirrel!  He is just too cute!

First, I cut down card stock and layered it on the left hand side of the Kraft card.  I then attached the ribbon and button for some flair.  Lastly I stamped the sentiment and colored.  It was actually very simple to make, but I just love the look of it.

Thoughts?

Supplies: Kraft Cardstock (Recollections); Chevron Cardstock (Pressed Petals); Green Ribbon (Offray); Button (Vintage); Stamps (Studio G); Ink (Studio G); Watercolor Pencils (Artist's Loft).

Monday, October 24, 2011

the Play Date Cafe - Challenge #104

Another fun challenge!

I played along with The Play Date Cafe's most current challenge.  The challenge required a combination of colors: Artichoke, Mauve, and Egg Yolk.  Quite a combination, but they pulled together pretty nicely.


To make this card, I cut down kraft to card size.  I then took the green (artichoke) and border punched the edge and adhered to the card. I then took the yellow (egg yolk) and corner punched one side of it and stamped the sentiment.  Lastly, I embellished with purple (mauve) punched flowers, rhinestones, and purple ribbon.

What do you think?
Supplies: Kraft (Recollections); Green (DCWV Border Strips); Yellow (Recollections); Stamp & Ink (Studio G); Border Punch (Martha Stewart Crafts); Corner Punch (Creative Memories); Flower Punches (Martha Stewart Crafts); Rhinestones (Recollections); Ribbon (Offray); Adhesive (Elmer's - No Wrinkle Glue); Glitter Spray (Tim Holtz).


Saturday, October 22, 2011

Buddies Card

I made this card for a challenge that I did not get to submit to in time (darn busy schedules!).  However, it really tested my ability to put together different color combinations.  The challenge required the use of Rust, Storm, and Deep Sea colors. 

It was pretty simple to make.  I took a scrap of "storm" polka dotted paper and adhered it to the cardstock.  I then added a strip of "rust" textured cardstock that I used a border punch on for a fancy design.  I also added a scrap scalloped "deep sea" card stock down the middle which I then embellished with some chipboard.  Lastly I added the sentiment to the side.

How did I do?


Supplies used to make this card: Recollections cardstock; DCWV border strips; Martha Stewart Craft edger; me and my big ideas chipboard; Recollections adhesive gems; DCWV sentiment; Elmer's adhesive; Zots.

Monday, October 17, 2011

Happy Halloween Card

One of my favorite things to do in downtime is to check out blogs for ideas and sometimes I even get a little adventurous and try one of the challenges!
This card I submitted to two challnges: the Cards Magazine CREATE: Blog Challenge and the Just Us Girls Challenge.
It was rather simple to make.  I first used black card stock for the background.  I then took pieces from DCWV Nautical (purple/blue diamond) and DCWV Glitter Strips (green diamonds) and made into diamond shapes.  I adhered them to the card in a pattern.  I then took Happy Halloween ribbon I purchased at the dollar store and adhere to the side of the diamond strip. 

Lastly, I used my Marvy Uchida circle punch for the purple circle, which I then used Studio G stamps & ink to put the Halloween themed sentiments, which I embellished with adhesive gems from Recollections.

Simple and very fun!  Gets me in the spirit of Halloween!

Monday, October 10, 2011

Spooky Halloween - CREATE: Blog Challenge Card

My Spooky Halloween Card, isn't it festive?


So, as many of you know, I love to submit cards I make to challenges.  This one was submitted and then featured to the CARDS Magazine CREATE: Blog Challenge.

For this card, I went with a kraft card stock background.  The grainy look/feel to this paper reminds me of fall and harvesting, something that goes along well with Halloween.  Next, I took 5 different types of orange scrap papers, cut them down to strips, and used my corner punch rounder on two ends of them and adhered them to the card.  Next, I took a piece of black cardstock and stamped the word Halloween (Studio G ink & stamp).  I cut down one side with a border punch (Martha Stewart Crafts) and then added two black brads to the end (Making Memories) and adhered to the card.  Lastly, I stamped Spooky on the top (Studio G ink & stamp) to finish the card. 

I was so blessed to have it featured on the CREATE: Blog, next to many other lovely cards, so please go check out the other submissions!

Saturday, October 8, 2011

Falling for You - PDCC #102

Look at the fun colors on this card!!

So, I found another fun online blog to participate in challenges for. It is called the The Play Date Cafe and it hosts fun challenges that I always love to see the neat designs that come out of them.  I got overly ambitious and decided to try it myself. 

This challenge required a color scheme of Frightening Fuchsia, Putrid Purple, Slime Green, and Black as Night - spooky colors for Halloween.


My card incorporated those colors, but I used a different theme than Halloween.  Instead,  I used the fuchsia as a backdrop, using my Martha Stewart Edger to give the cardstock some flair.  Then, I used Studio G stamps and ink to place the sentiment on the green card stock.  I placed Making Memories green gems around the trees for falling leaves.  I layered the green on top of the purple and black cardstock, then tying it together with purple ribbon by Offray. Lastly on the card I used purple ink to place the leaves and green gems to tie it together. 

What do you think?  Do you like it?


Happy Halloween Sign

So, the other day I came across some extra chipboard pieces that I had left over from another project.  I was inspired by lots of the Halloween blogs and beautiful products out there, so I decided to craft something fun up!


I covered the chipboard in orange card stock first and let dry.  I then used sandpaper to sad the edges to make the cardstock and chipboard one. 

Next, I took some extra Colorbok Glitter paper and trimmed it down, using a Martha Stewart Edger punch on one side, and then adhered to the card stock.

I then took extra Halloween foam stickers and a Happy Halloween decorated chipboard and adhered to the card.  Lastly, I took some of the extra Happy Halloween ribbon that I had found at the dollar store last year to loop through the holes to hang it with.  This beautiful piece now resides in my office at work to remind me of the craft I so adore!

And to best use the chipboard, I decorated the back too with 4th of July decor, so I can hang it in the summer :)

Wednesday, October 5, 2011

Best Wishes - Card Challenge

In addition to making cards for people, events, and hobby, I also love to submit cards to challenges.  I find it tests my creativity, and makes me think outside the box.  Also, I have been told I am competitive, although, I am not so sure that is a factor!

I made this card for a co-worker who ended his job rotation at our office and is returning to his old office across town.  The need to make this card came at the same time the challenge arose, so I took the opportunity to try it out.  Cards Magazine has this great Create: Blog, and the challenge of the week was to make a card using at least three border punches.

So, to start with, I took three papers, and cut them down to various sizes, and then used border punches by Recollections and Martha Stewart Crafts to make edges on both sides, which I then adhered to the card stock (Recollections).

Then, I cut down the green paper, and used the Martha Stewart Punch Around the Page - corner to make the punch to incorporate a tag-like feel.  I then stamped Best Wishes with Studio G ink on a K&Company tag, and then adhered to the top of the makeshift green tag.  Lastly, I added bakers twine and used 3-D Pop Dots to make it stand out. 

I didn't win, but it was a great challenge, and even better card! 

Wednesday, September 28, 2011

Personal Card - Birthday


Typically orange is not my favorite color, but I have to say put on the right papers, it sure comes together beautifully! Earlier this year I had purchased a couple of new paper stack at Michaels (they were half off!!) that actually were along the same lines:  Recollections Animal Kindgom and DCWV Wild Thing stacks.   They featured beautiful papers with animal prints.  Seeing all the pretty oranges I decied to have a little bit of mix & match.

I picked out about eight different patterns, and used my Creative Memories hexagon punch to cut out the shapes.  On my Recollections card stock, I glued a pattern of hexagon's down on the bottom.  This took a little time and I had to cut them down in size as well so it would lay like a strip of paper across the bottom of the card.
Over the top of the papers I took adhesive ribbon and punched a small hole to add the button brad and sheer bown to the left side, and then adhered to the top of the card.

Lastly, I added 3 hexagon shapes on the top of the page, the middle one having a pop dot so it stood out, and then added the J initial sticker (Making Memories).


Not bad for orange???


Thursday, September 22, 2011

A Boy Card?

One of the harder cards for me to design is the "boy" cards as I call them.  Ultimately when I design them for a person, I try to reflect part of that person into the card to make it more personal.  Well, not many of the "boys" I know are pretty, sparkly, or shiny like many of the papers and embellishments I own, which requires more thought when making my selections for "boy" cards.
So this is one of the cards I made for Father's Day for one of the many "Grandpa's" we send our love too.  It was getting close to July and I acquired some beautiful papers that played into the Red, White and Blue theme as well as dug out some coordinating scraps for another project I was working on.  Somehow it translated into a card.

First, I took 4 blue papers (most are DCWV, although one is a scrap I have had for quite some time) and used my square punch (Creative Memories) to punch them into square shapes.  Then I used my corner rounder (also Creative Memories) to round two of the opposing corners on each square.  I then adhered them to the white card stock (Recollections). 

I then took my Marvy Uchida star punch and punched a single star from red cardstock which I adhered to the page with a pop-dot to make it stand out a little bit.  Lastly I added the Grandpa with Making Memories letters I had on hand.

Overall, not bad for a boy card, and many of the men in our family are extremely patriotic, so this fit the personality too!

Tuesday, September 20, 2011

Thanks - Bright & Cheery Card

As fall sets in, I am reflecting on summer and the beautiful colors I will miss come winter.  Like yellow!  This yellow always calls out to me.  I just love the sunshine feel to it, warm & bright, full of happiness. I love this color combination so much, I have used it on a different variation of this card before. It is perfect for a thank you note!

First, I layered two different sheets of paper from DCWV's Street Lace stack.  The black deco on the bottom, and the white deco on the top. Then I used a yellow piece from DCWV's border strips.  It is textured, so it has a nice feel to it.  I trimmed down the edge with my Martha Stewart Crafts edger, and then stamped the Thanks Sentiment on (Studio G stamp & ink).  I then used some Offray ribbon across the top and fashioned a bow, using a button brad by Making Memories to secure the bow to the page.

All in all, simple yet lovely.

Friday, September 16, 2011

Thinking of You - Card

Thinking of you cards are one of the toughest to make.  (Aside from "boy" cards!). I always want to be sensitive to the message, but at the same time, making a fashion statement with card.
For this card, I tried to keep it clean and simple, yet elegant.

I started with selecting some pretty blue papers from the DCWV Nautical stack.  I cut them down to strips, and then used my Martha Stewart Crafts edger on each one.  I then layered them over each other adhering with no specific pattern.

At the top of the layered pieces, I adhered a blue polka dot ribbon by Celebrate It - Basic Narrows, and then fashioned a folded over ribbon which I secured with a brad on the left hand side.  I then adhered the whole chunk to the card. 

Lastly, I used my Studio G stamps and ink to add the the "thinking of you" sentiment to the card.

I love the colors of the card.  Blue is one of my favorite colors to put on a card. :)

Thanks for checking out my latest creation!

Tuesday, September 13, 2011

Best Wishes - Bridal Shower Card

For my little sister's bridal shower, I fashioned a card that reminded me of old school elegance, yet pulled in her wedding colors: red, black, and silver.

First, I cut down a sheet from the DCWV Nautical stack and trimmed it to the size of a card. I love the pattern and color of the red!

Next, I trimmed down a black piece of cardstock and then used my Martha Stewart Crafts edger to make the cool doily lace edge and adhered to the card.

I then took a piece of paper doily (I think I got this at the dollar store!) and trimmed it down and folded it over the edge of the card and black strip. Before adhering to the card, I took out my black stamp pad ink and went over the white.  It dulled it down so it was not so blaring white and made the doily look more authentic.  Then I adhered to the card and trimmed off any excess and then added black and red adhesive gems from Recollections to the doily design for a little bling.

Last, I used EK Success letter stickers to spell out best wishes in silver foil.

Monday, September 12, 2011

A Retirement Card

Recently one of the managers at my job retired.  I made this card to present to him at his retirement party.  The colors were clean and simple, yet classic, very much like him who among many of his achievements use to be a police officer .

The cardstock is from Recollections. To start off with I cut down a DCWV mat stack piece from the La Creme collection (bottom cream with black designs) and adhered to the card.  I then took another coordinating paper from the same mat stack and used my Martha Stewart edger t make the circle designs and then adhered to the card.

On top, I use my Marvy Uchida scalloped circle punch to cut down black paper.  On top of it, I used a smaller Marvy Uchida circle punch to cut down a piece of coordinating paper from the Street Lace paper stack by DCWV.  I then adhered to the card.

Lastly, I cut down some Recollections creme card stock and used a celebrate sentiment stamp.  To draw the eye to the sentiment, I used some of my Recollections black adhesive gems.

I love the simple, yet elegant look of this card!

Have a nice Monday!

Wednesday, September 7, 2011

Thanks a bunch - Card

I really love the colors of this card!  Pink of course is my favorite color, but these colors go so nicely together!
I started by pulling tow coordinating papers from my Street Lace paper stack by DCWV.  I cut them down, the light white one a small strip on top, the black/white design on the bottom; adhering to the card.  Next I took some textured bordered strips from DCWV and used my Martha Steward edger on to punch the border.  I stamped the sentiment (Hampton Art stamp, Studio G Ink) and lastly added flower embellishments (Making Memories and Prima) and adhered them to the pink strip with brads (Making Memories) and lastly adhered the strip to the card.  It was a beautiful focal point, and made the sentiment pop with color!