Wednesday, September 28, 2011

Personal Card - Birthday


Typically orange is not my favorite color, but I have to say put on the right papers, it sure comes together beautifully! Earlier this year I had purchased a couple of new paper stack at Michaels (they were half off!!) that actually were along the same lines:  Recollections Animal Kindgom and DCWV Wild Thing stacks.   They featured beautiful papers with animal prints.  Seeing all the pretty oranges I decied to have a little bit of mix & match.

I picked out about eight different patterns, and used my Creative Memories hexagon punch to cut out the shapes.  On my Recollections card stock, I glued a pattern of hexagon's down on the bottom.  This took a little time and I had to cut them down in size as well so it would lay like a strip of paper across the bottom of the card.
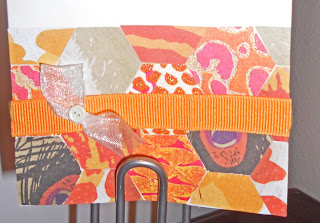
Over the top of the papers I took adhesive ribbon and punched a small hole to add the button brad and sheer bown to the left side, and then adhered to the top of the card.

Lastly, I added 3 hexagon shapes on the top of the page, the middle one having a pop dot so it stood out, and then added the J initial sticker (Making Memories).


Not bad for orange???


Thursday, September 22, 2011

A Boy Card?

One of the harder cards for me to design is the "boy" cards as I call them.  Ultimately when I design them for a person, I try to reflect part of that person into the card to make it more personal.  Well, not many of the "boys" I know are pretty, sparkly, or shiny like many of the papers and embellishments I own, which requires more thought when making my selections for "boy" cards.
So this is one of the cards I made for Father's Day for one of the many "Grandpa's" we send our love too.  It was getting close to July and I acquired some beautiful papers that played into the Red, White and Blue theme as well as dug out some coordinating scraps for another project I was working on.  Somehow it translated into a card.

First, I took 4 blue papers (most are DCWV, although one is a scrap I have had for quite some time) and used my square punch (Creative Memories) to punch them into square shapes.  Then I used my corner rounder (also Creative Memories) to round two of the opposing corners on each square.  I then adhered them to the white card stock (Recollections). 

I then took my Marvy Uchida star punch and punched a single star from red cardstock which I adhered to the page with a pop-dot to make it stand out a little bit.  Lastly I added the Grandpa with Making Memories letters I had on hand.

Overall, not bad for a boy card, and many of the men in our family are extremely patriotic, so this fit the personality too!

Tuesday, September 20, 2011

Thanks - Bright & Cheery Card

As fall sets in, I am reflecting on summer and the beautiful colors I will miss come winter.  Like yellow!  This yellow always calls out to me.  I just love the sunshine feel to it, warm & bright, full of happiness. I love this color combination so much, I have used it on a different variation of this card before. It is perfect for a thank you note!

First, I layered two different sheets of paper from DCWV's Street Lace stack.  The black deco on the bottom, and the white deco on the top. Then I used a yellow piece from DCWV's border strips.  It is textured, so it has a nice feel to it.  I trimmed down the edge with my Martha Stewart Crafts edger, and then stamped the Thanks Sentiment on (Studio G stamp & ink).  I then used some Offray ribbon across the top and fashioned a bow, using a button brad by Making Memories to secure the bow to the page.

All in all, simple yet lovely.

Friday, September 16, 2011

Thinking of You - Card

Thinking of you cards are one of the toughest to make.  (Aside from "boy" cards!). I always want to be sensitive to the message, but at the same time, making a fashion statement with card.
For this card, I tried to keep it clean and simple, yet elegant.

I started with selecting some pretty blue papers from the DCWV Nautical stack.  I cut them down to strips, and then used my Martha Stewart Crafts edger on each one.  I then layered them over each other adhering with no specific pattern.

At the top of the layered pieces, I adhered a blue polka dot ribbon by Celebrate It - Basic Narrows, and then fashioned a folded over ribbon which I secured with a brad on the left hand side.  I then adhered the whole chunk to the card. 

Lastly, I used my Studio G stamps and ink to add the the "thinking of you" sentiment to the card.

I love the colors of the card.  Blue is one of my favorite colors to put on a card. :)

Thanks for checking out my latest creation!

Tuesday, September 13, 2011

Best Wishes - Bridal Shower Card

For my little sister's bridal shower, I fashioned a card that reminded me of old school elegance, yet pulled in her wedding colors: red, black, and silver.

First, I cut down a sheet from the DCWV Nautical stack and trimmed it to the size of a card. I love the pattern and color of the red!

Next, I trimmed down a black piece of cardstock and then used my Martha Stewart Crafts edger to make the cool doily lace edge and adhered to the card.

I then took a piece of paper doily (I think I got this at the dollar store!) and trimmed it down and folded it over the edge of the card and black strip. Before adhering to the card, I took out my black stamp pad ink and went over the white.  It dulled it down so it was not so blaring white and made the doily look more authentic.  Then I adhered to the card and trimmed off any excess and then added black and red adhesive gems from Recollections to the doily design for a little bling.

Last, I used EK Success letter stickers to spell out best wishes in silver foil.

Monday, September 12, 2011

A Retirement Card

Recently one of the managers at my job retired.  I made this card to present to him at his retirement party.  The colors were clean and simple, yet classic, very much like him who among many of his achievements use to be a police officer .

The cardstock is from Recollections. To start off with I cut down a DCWV mat stack piece from the La Creme collection (bottom cream with black designs) and adhered to the card.  I then took another coordinating paper from the same mat stack and used my Martha Stewart edger t make the circle designs and then adhered to the card.

On top, I use my Marvy Uchida scalloped circle punch to cut down black paper.  On top of it, I used a smaller Marvy Uchida circle punch to cut down a piece of coordinating paper from the Street Lace paper stack by DCWV.  I then adhered to the card.

Lastly, I cut down some Recollections creme card stock and used a celebrate sentiment stamp.  To draw the eye to the sentiment, I used some of my Recollections black adhesive gems.

I love the simple, yet elegant look of this card!

Have a nice Monday!

Wednesday, September 7, 2011

Thanks a bunch - Card

I really love the colors of this card!  Pink of course is my favorite color, but these colors go so nicely together!
I started by pulling tow coordinating papers from my Street Lace paper stack by DCWV.  I cut them down, the light white one a small strip on top, the black/white design on the bottom; adhering to the card.  Next I took some textured bordered strips from DCWV and used my Martha Steward edger on to punch the border.  I stamped the sentiment (Hampton Art stamp, Studio G Ink) and lastly added flower embellishments (Making Memories and Prima) and adhered them to the pink strip with brads (Making Memories) and lastly adhered the strip to the card.  It was a beautiful focal point, and made the sentiment pop with color!

Tuesday, September 6, 2011

Thanks a bunch - Card

I am a firm believer in a Thank You card.  If someone does something nice for you, taking the time to send a personal note of thanks shows your gratitude. And it helps if your note is decorated in style!!

For this card, I used some coordinating papers from a stack of papers I picked up at Ross Dress for Less by Pressed Petals.  It was an impulse buy, but I have to say, I love the papers!!

First, I layered the top cream piece with animal print circles, and the bottom brown piece and adhered to the card.  Across the middle, I cut down a piece of kraft paper and used my Martha Stewart edger to make the zig zag design (it also embosses the zig zag if you look close!).

Over to top, I adhered some Offray green ribbon and tied a bow.  To complete the look, I used green card stock from Recollections and used my Marvy Uchida square scalloped punch.  I then stamped flowers in gold (Studio G Ink, Hampton Art stamps) and the sentiment as well.  I adhered to the card with Pop Dots.

I love the fun colors of this card!